Thursday, November 21, 2013

Cap of St Birgitta Tutorial

This is a tutorial on how to make the "Cap of St Birgitta," a coif seen in Medieval Europe from the 15th century through the 15th (and possibly early 16th) centuries. This is based on the one extant example as well as various period visual sources. You can read my previous posts on the cap for more information here or here, or you can visit Medieval Silkwork (where I first discovered the cap).

I love this cap, it is perfect to wear on its own or under hats and veils. It keeps my hair clean all weekend (if I wear it) and helps my outfits look "right". If you have any questions, please leave comments!

The author and Amya Weaver (Caid) wearing
my first two attempts at the making the cap
Directions:
1. Cap - First cut 2 squares of your linen. For a generic cap, I cut 10.5-10.75" squares for a small, 10.75-11" for a medium and 11-11.25" for a large head.

To cut based on your head measurement, measure your head around with the measuring tape going from your hairline in front (forehead) to the nape of your neck (this is where the cap will sit when being worn). Divide this number in half and add .5” for seam allowance.

Example: My head is 20.5” (20.5/2) + .5 = 10.75 - I normally wear a women's small in hats.

NOTE: Your two pieces do not have to be perfectly square. Two rectangles of the same size will also work (especially if you have short or thin hair). If you do go with a rectangle, the long side should be oriented upright to follow this diagram.

Ties/Loop - Cut about 60-70 inches of 2 inch wide strips for the ties. If you have to cut several lengths to get sufficient length, sew the ends together to make one long strip.


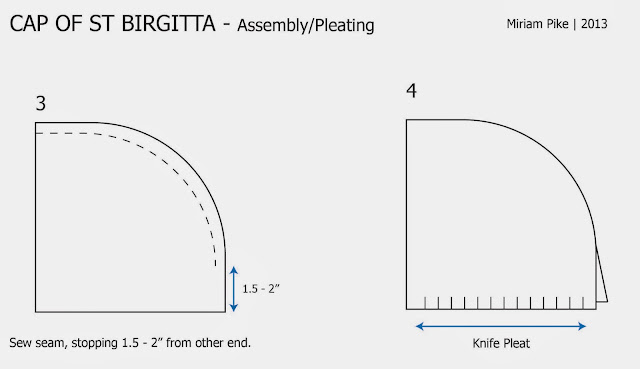
2 Now round one corner of both pieces as shown above. This does not have to be a perfect curve, but try to avoid sharp turns.

3 Sewing - Sew both sides of the cap together along the edge you have just curved as shown. Start at the edge on one side and stitch down to 1.5-2” from the edge on the other side. Finish this seam by pressing the seam allowance away from the seam on each side and sewing down.

Optional Embroidered Seam: The extant cap has an inset embroidery replacing this seam that connects the two halves. If you want to try this out, work your embroidery stitch in place of the seam. Check out how these tutorials for the embroidery:

Elysa's Endeavors (really nice, clear drawings of the embroidery)


4-5. Pleating - Now that the top seam of your cap is sewn, you will be pleating the bottom edge of the cap. This is the square edge of the cap on either side of the gap you left when sewing the top seam (shown with the blue arrow above). I usually do stacked knife pleats (one on top of another); you want the finished pleated length to be between 2-3”. A depth of .75-1" pleats works well for me in a medium weight linen. Once you have the pleats arranged, either baste or pin them to keep them in place while you sew on the ties. You will have a corner at the front of the cap (away from the seam), either round the corner off slightly, or make one last pleat that is tucked sideways to make a continuous line as you see in figure 5.

For information on how to pleat fabric and other options for pleats, try the Elizabethan Costuming Page

6 Attaching the ties - Now, take the strips you cut earlier, these will be your ties for the cap. If you have not already done so, make sure your strips are sewn together to form one long strip. Now, iron your strip with these 2 steps:

1) fold the edge over on each side by about 1/4 inch and iron
2) fold the strip in half and iron again.

Once that is done, pin the tie/loop around the raw edge of the cap, and begin stitching it down. I usually start at the center front and stitch one side and then the other. If you have not yet rounded the corner at the front of the cap, you will need to do that as you sew on the tie. Stop stitching once you reach the gap at the back of the cap after the pleats. Sew the ties down on the other side of the cap (starting from the center front) the same as the first side.

7 Finishing - When you are done with that side, try on the cap and figure out the length your ties need to be. To try on your cap, the ties should crisscross in back of your head under your bun/hair, and cross to your forhead at the front of the cap. There they crisscross and the last loop lays on the back of your head over your hair The key to this cap is a fairly snug fit. Linen stretches when warm so it will loosen gradually as you wear it. This is fairly easy to make smaller later if you need to change the size. Pin the ends of the ties together once you have found a length that works for you. Take the cap off and sew the ends of your ties together at the point you marked. Now sew the tie closed along the length of the tie.
Wearing the Cap
Left: Sleeves GFD over long-sleeved shift with cap.
Middle: Red overgown over green GFD, or gothic fitted gown.
Right: Another view of the plain cap (Baronial A&S)
Since the cap spans a range of several centuries, you have a fairly broad range of things to wear it with. I generally wear my cap with my 14th/15th century garb as it completes the outfit so well. I generally braid my hair in two braids and either pin or sew it back and forth at the back of my head to fill out the cap. I have put my hair up in a straight bun before, but I find it pokes the cap out at the back, rather than filling it out nicely.

Over the Cap?
Left: 14th century cotehardie with cap and veil.
Middle: Working class Flemish outfit (1570s) with cap and a flat cap on top.
Right: Working Class Flemish with straw hat over cap.
The cap also makes a fabulous foundation layer for other headgear. In addition to being worn on their own, caps were worn under veils (as seen in these Italian images) and hats. With a couple of hat pins/straight pins at the ready, you are all set!

Links and Sources:
-Dahl, C.L. & I. Sturtewagen, 2008, The Cap of St. Birgitta, Medieval Clothing and Textiles vol. IV, pp. 99-129
- Medieval Silk Work - Women's Caps
-More of my Cap of St Birgitta images on Pinterest

P.S. I love seeing finished caps! So link to yours if you have pics.

Follow Miriam Pike Cap of St Birgitta on Pinterest


Tuesday, November 19, 2013

More Fringe hat!

I have discovered the pinterest widget. Let's see if I can make it work here for the fringed cap: Follow Miriam Pike Kappe - Fringed German Hat on Pinterest

Update: Okay, didn't work at first, but I think I have it working now, let me know if it doesn't work for you!

Sunday, November 17, 2013

Cap of St Birgitta - Italian style

In 2009 I made my first cap of St Birgitta. I discovered the cap through Medieval Silk Work (a fabulous blog if you haven't already discovered it) and decided I loved the cap.

Since making my fist cap in 2009, I have been keeping my eye out for images of these caps in other places/times.

I have found a number of Images from the 14th and 15th century in Italy that greatly resemble the shape and style of the cap suggested by Isis on her blog and in her article of the Cap of St Birgitta in Medieval Clothing and Textiles IV (Dahl, C.L. & I. Sturtewagen, 2008, The Cap of St. Birgitta, Medieval Clothing and Textiles vol. IV, pp. 99-129.). She talks about these plain white caps that can be seen "from the 13th to 15th centuries. Examples are known from Italy, France, The Low Countries, Scandinavia"...


Maciejowski Bible c 1250 | image from Medieval Silk Work

Images of this style of cap typically show a white cap that goes in an continuous line from the forehead to the nape of the neck. A loop at the base of the neck is then looped over the head (as seen above) to tension the cap and secure it in place. The length of the loop determines if the loop sits over the bun (as seen in the Maciejowski bible images above) or below the bun.


I have posted some images to more easily compare with the the following images I have collected:

1508 Girolamo di Benvenuto,
Portrait of a Young Woman
Although ties are not visible on this first image, the shape of the cap greatly resembles the Cap of St Birgitta, with the small white cap covering the hair and gathered at the base of the neck.

This young woman is also wearing a sheer veil over her cap.


1452-66 | Fra Filippo Lippi | Detail of
 Fresco cycle in the Prato Cathedral
This second image clearly shows the loop crisscrossed to the back of the head and worn behind the ears.


1328; Simone Martina: Detail of
 A Child fallen out his cradle healed by
 Blessed Augustine; Sienna
The earliest of the three, this last image is a little harder to see (this is a small figure in the original image), but you can see the cap worn under a sheer veil as in the first image. You can also see the indent in the cap at the back of the head that could indicate the loop.


Links and Sources:
-Dahl, C.L. & I. Sturtewagen, 2008, The Cap of St. Birgitta, Medieval Clothing and Textiles vol. IV, pp. 99-129
- Medieval Silk Work - Women's Caps
-More of my Cap of St Birgitta images on Pinterest
My tutorial on how to make the Cap of St Birgitta

Tuesday, November 12, 2013

15th Century Fringe Hat (aka The Squid Hat)

Recently I have become enamored of late 15th century German clothing (aka The Housebook Dress). So I made myself a brand new dress and discovered I needed a new hat to go with it.

When looking at images of the dress in German art, I discovered a plethora of hat styles. Among the many fabulous styles to go with this dress (the 15th century really has the best hats), there is one stand out as far and away the silliest. I present... the fringe hat:


Happily, there are many representations of this hat out there. Here are a few:
Master BXG "Young Woman"
Master of the Housebook "Lady with a
letter Coat of Arms"  1475-1500


Master ES "Lady with the Austrian Coat
of Arms" British Musuem 1450-67


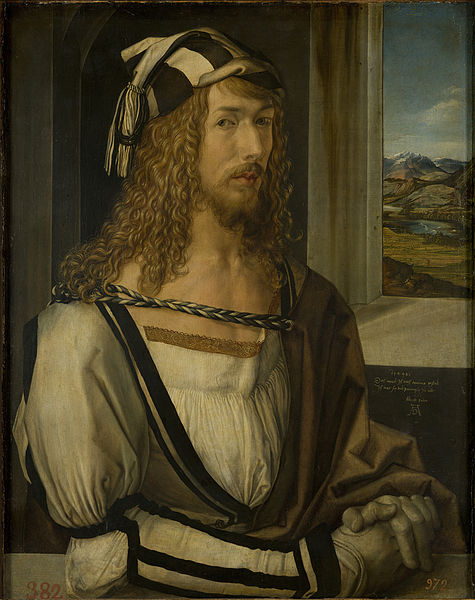
This hat is fun and easy to make! It is also appropriate for men and women (at least 2 Durer self portraits show him in variations on this hat). This self portrait of Durer shows a striped variation:
Durer Self Portrait 1498
After having several people ask me how to make one... I made a quick tutorial. This hat took under half an hour, entirely hand sewn, so it makes a great last minute project. And you look so stylish in it! Thanks to my fabulous friend Lorien for making the first of these and inspiring me to want one of my very own.

Cutting
To make the hat you will need a piece of wool, lightly or heavily fulled (I recommend lightly fulled as your fringe will drape better). The piece should be 30" long by your head measurement plus 1" for seam allowance.
For example: my head is 21.5", so my rectangle was 30" x 22.5"


Assembly
Take your piece of fabric and pin the long ends (30" sides) together and sew the seam of your choice to make a tube. The trick is to start and end the seam about 5" in from each end to allow for fringe (see diagram).

Now, cut the ends of the tube into thin strips to make fringe. How wide is up to you, but you will want to aim for half an inch to an inch depending on what you want.

Now, pull one end of the fringe down through the middle and match the fringe up on the other side (folding in half by pulling one side inside). Now, fold up the end away from the fringe a little to make a jaunty brim and voila! You have a hat.


You can easily adjust the length of the fringe by cutting it up further. If you used a fulled wool, you also don't need to worry about finishing that wool at all! Hooray.


Now for hair, just put your hair in two braids and pin them at the top of your head. Easy peasy.


Further Reading:

For many more visual sources, check out Eme's Compendium

My Pinterest devoted to late 15th century German
and one specifically on the Fringed Hat

Also try looking up "Housebook Dress" for fun dress diaries and inspiration.